












Teachers
The 'Announcements' feature on mySecondTeacher allows teachers and school leaders to send important updates to specific classes, groups, or the entire school. School leaders can also share eConsent forms and polls with students, teachers, and parents.
The Announcements will be visible to Students, Parents, and Teachers on the "Noticeboard" every time they log in to mySecondTeacher, until the announcement deadline is reached.
Your password may not be accepted due to incorrect entry or not meeting security requirements.
If you’re creating a new password, make sure it includes at least 8 alphanumeric characters with at least one special character (!, @, #, $, %).
If it’s not being accepted during login, check for typos, ensure the caps lock is off, and retry. A captcha might pop up for security reasons.
If it still doesn’t work, try the “Forgot your password?” option.
The Testpaper feature on mySecondTeacher allows both teachers and students to generate practice Testpapers based on curriculum-aligned topics, question types, and difficulty levels.
Teachers can create custom assessments, download and edit Testpapers, and assign them to students.
Students can generate Testpapers for self-practice or attempt Testpapers assigned by their teachers.
This issue may be caused by an incorrect email or password entry. If the problem continues, please use “Forgot your password?” feature.
Also, please ensure that you have entered the correct User ID and password, and check that the Caps Lock key is turned off before attempting to sign in again.
Please follow the given steps to see reports for a particular video:
Login to your Teacher Account
Click on the "Teaching Resources" tab from the homepage
Click on "All Subjects" and select a subject
Select a specific Interactive Video that you want to access reports for
In the Diagnostic Reports section, you can choose between "Latest Attempt" and "First Attempt"
Click on "View" to access an individual Student's report.
For Mobile App,
Please follow the given steps to see reports for a particular video:
Login to your Teacher account
Click on the "Resources" tab from the bottom navbar
Select the subject you want to view the videos of
Select the chapter and click on the video
Click on the “Report” section to see the detailed diagnostic report for that video.
In the Report section, you can choose between "Latest Attempt" and "First Attempt"
Click on the list of "Mastery" to access an individual Student's report.
The 'Chat Rooms' feature in mySecondTeacher is a communication channel where teachers and students can discuss specific classes or projects through individual or group conversations and file sharing. It provides a dedicated space for updates, announcements, and resources, encouraging collaboration and active participation.
The Assignment feature on mySecondTeacher streamlines assignment management for both teachers and students.
Teachers can create, assign, grade, and provide feedback on assignments directly through the platform.
Students receive notifications for assigned work, submit assignments online, and view their grades and feedback once they are published.
mySecondTeacher is a multiple award-winning academic delivery platform used in 51+ countries globally by students, teachers, parents, and school leaders.
For Students, mySecondTeacher offers curriculum-aligned eBooks, Interactive Videos, and Topic-wise Videos for interactive learning experiences. Students can also attend online classes, submit assignments, access class timetables, generate Testpapers for practice, and collaborate with teachers and classmates for discussions or group projects.
For Teachers, the platform provides a wide range of Teaching Resources such as eBooks, Videos, PPTs, PDFs, and more, which can be utilised for classroom discussions or assigned to students as Assignments. Teachers can also generate Testpapers to assess student performance and schedule Sessions to manage upcoming classes effectively.
Likewise, mySecondTeacher provides performance monitoring for School Leaders to support data-driven decision-making and streamline academic operations.
And, Parents can also utilise this platform by linking their child’s account to monitor school activities, view assignment details, and receive important school announcements.
Please follow the given steps to give Assignment to your Students:
Login to your Teacher account
Click on the "Assignments" tab from the homepage
Click on "Give Assignment"
Select the relevant class(es)
Enter the Assignment title and description
Upload the required files or add URL links, if applicable
Select the grading system and set the submission deadline
If required, enable "Make it available for later" and set the date and time
Click on "Continue"
For Mobile App,
Please follow the given steps to give out Assignments:
Login to your Teacher account
Click on "Give Assignments" on the "Assignments" action card
or
Click on "Classrooms" tab on the bottom navbar and select "Assignments"
Click on "Give New Assignment"
Choose the type of assignment you would like to provide to your Students.
Fill in the required details
Click on "Continue".
The Students of the class(es) will be notified when they login to mySecondTeacher.
Cache is a temporary storage used by your browser to save files such as images, fonts, CSS, HTML, and JavaScript from websites you visit.
This helps websites load faster because your browser does not need to re-download all the files every time you visit a page.
However, sometimes the stored (cached) version of a website may differ from the updated version available online. This can lead to display issues, glitches, or outdated content being shown.
Clearing cache helps resolve these issues by removing stored files and allowing your browser to load the most recent version of the website. It can also improve performance, especially on platforms like mySecondTeacher where content is frequently updated.
Follow the given steps to create a Chat Room for your Students:
Login to your Teacher account
Click on "Chat Rooms" tab on the bottom navbar
On the right column in the Chat Room, click on (+New) sign and "Create Channel" to create a new channel
Type in the name of the new channel
Add a short description of the channel
Add your Students to your channel (You can also make a private channel)
Click on "Create Channel".
After your channel is created successfully, type in the message and send it to your Students.
Please follow the given steps to log in to the platform:
Open your internet browser (Google Chrome is recommended for best performance)
Go to "www.mysecondteacher.com.np"
Once you’re on the website, click on “Login” on the top right
Login using the email and password provided by your school.
Now, you should be able to log in to your account with ease.
For Mobile App:
Go to your App Store (iOS) or Play Store (Android)
Next, search for ‘mySecondTeacher Nepal’ app (make sure you’ve selected the Nepal app and not the Global one)
Click on the “Install” or “Get” button to download the app
Next, open the app and login using the email and password provided by your school.
Now, you should be able to log in to your account with ease.
Note: Please contact your school Admin if you haven't received the email and password.
Completion represents the total number of Interactive Videos students have finished watching. To achieve 100% completion, students must watch all the videos for a subject.
Mastery reflects students’ mastery achieved after completing the End-of-Lesson quizzes in the Interactive Videos. To get 100% Mastery, students must score full marks on their quizzes.
Please follow these stepsto create an Announcement:
Login to your mySecondTeacher account
Click on "Announcements" action card from the homepage
Or, simply go to the "Announcements" tab from the homepage
Click on "New Announcements" and select "Make General Announcement" or "Get Response" from the drop-down options
Now, select the audience: Parents, Teachers, or Students
Choose whether to anounce to the entire school or a specific class and click on "Continue"
Fill in your announcement message and set the end date for it
Click on "Continue".
The announcement will be posted immediately and visible to the targeted users.
Teacher’s Content is a feature that allows teachers to share essential learning materials, such as lecture notes and study guides, with students, giving them easy access to important resources.
Please follow the given steps to update your password:
Login to your mySecondTeacher account using your current email address and password
Click on the Profile icon or your profile picture at the top-right corner of the platform
Select "My Profile"
Click on the "Password" tab from the category
Enter your new password in the "New Password" field
Re-enter your new password in the "Confirm New Password" field
Click on "Save Changes."
For Mobile App:
Please follow the given steps in order to change your password:
Login to your mySecondTeacher account
Click on “More” from the bottom navbar
Select “Account”
Click on the “Password & Biometrics” tab from the category
Click on “Change Password”
Enter your current password and enter your new password
Confirm your new password and click on “Save Changes”.
Note: Your password must be at least 8 characters long and include a combination of letters, numbers, and special characters. For security purposes, we recommend updating your password every 3 to 6 months.
For security reasons, your mySecondTeacher password must meet the following requirements:
Must be at least 8 characters long and less than 30 characters
Must contain both letters and numbers
Must include at least one special character (e.g., !, @, #, $)
Example: Learn#456
Note: To help keep your account secure, we recommend that you update your password every 3 to 6 months.
Please follow the given steps grade student Assignments:
Login to your Teacher account
Click on the "Classrooms" tab from the navigation menu
Select the relevant subject
Click on "Assignments"
Locate the Assignment you wish to review
View the list of students, their submission status, and submitted files
Click on "Full Report" to view detailed Assignment information
Enter grades and remarks in the respective fields
For Mobile App,
Login to your Teacher account
Click on “Classrooms” tab on the bottom navbar
Open Assignments
Click on “Full report”
Click on “Add Grade/Remarks”
Fill all the details such as: Marks, Remarks, and add Remarks file or links
Click on “Submit”.
After generating a Testpaper on mySecondTeacher, you can easily access it from the "Testpapers" tab.
This section displays all your previously generated Testpapers, allowing you to view, edit, or continue working on them as needed.
Please follow the given steps to upload resources to “My Resources” or “School Resources”:
Login to your Teacher account
Click on “Teaching Resources” tab on the homepage
Click on “My Resources” or “School Resources”
Select the “My Resources” or “School Resources” option available
Click on the “Upload” button and select “Upload file”
Fill out the required details and click on the “Save” button.
Note: By selecting the “New Folder” button, you can create a folder into which the resources can be uploaded. Additionally, the file size of the uploaded document should not exceed 100 MB.
Yes, you can edit announcements. Please follow the given steps to edit announcements:
Login to your mySecondTeacher Account
Click on the “Announcements” tab from the homepage
Under the “Ongoing” tab, select the announcement you want to edit
Click on “Edit Announcement”
Make the required changes to the announcement
Click on “Continue”
Click on “Announce” to save and publish the updated announcement.
Please follow the given steps to clear the cache on an iPhone application:
Open "Settings" on your iPhone
Go to "General"
Tap on "iPhone Storage"
Scroll and select the app you want to clear cache for (e.g., mySecondTeacher)
Tap on "Offload App"
Confirm by tapping "Offload App" again
After offloading, tap on "Reinstall App" to download it again
Note: iOS does not have a direct “Clear Cache” option. Offloading the app helps clear cached data while keeping your app data intact.
Please follow the given steps to stop ongoing announcements:
Login to your Teacher Account
Click on the “Announcements” tab
Under the “Ongoing” tab, you’ll find a list of all the announcements you’ve posted
On the right side of each announcement, you’ll see a “Stop Announcement” button
Click on the “Stop Announcement” button for the announcement you want to stop
A confirmation message will appear asking if you really want to stop the announcement. Click “Stop Announcement” to confirm
The announcement will stop immediately.
Please note that if an announcement has a set expiration date, it will automatically stop on that date. However, you can also manually stop any announcement at any time using the above steps.
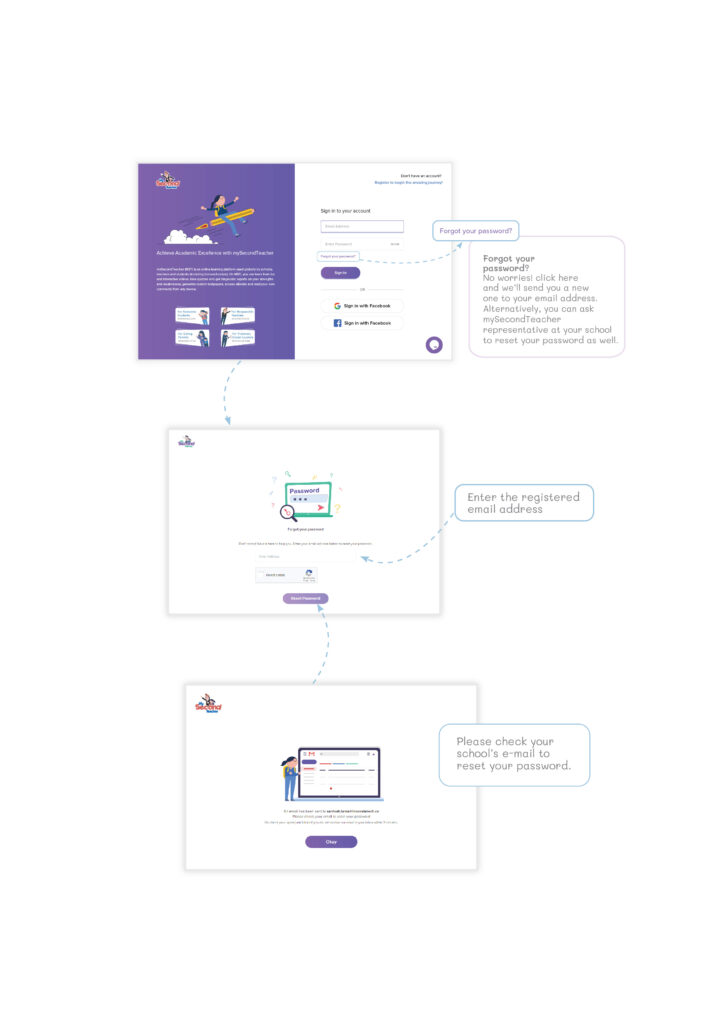
Please follow the given steps to reset your mySecondTeacher account password:
Go to the Login page and click on "Forgot Your Password?"
Enter the email address associated with your account
Click on "Reset Password"
Check your email for the password reset link
Click on the "Reset Password" button in the email
You will be redirected to the password reset page
Enter your new password in the "New Password" field
Click on "Save Changes"
Login to your account using your new password
Note: Please refer to the provided screenshots and video guide for additional assistance. If you continue to experience issues, kindly contact our support team through the Live Chat feature available on the platform.
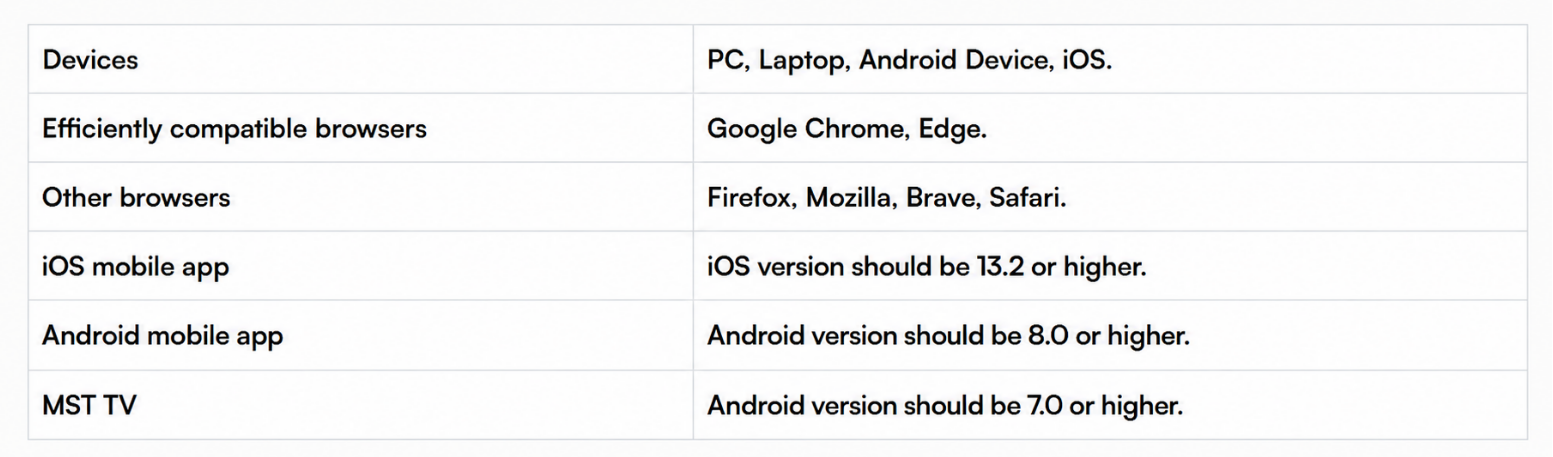
mySecondTeacher can be accessed on various devices with an internet connection. For the best experience, please ensure your device meets the minimum system requirements listed in the table below:
In the case of a Normal Testpaper, you can simply save them as a PDF or copy the questions on the Testpaper and use word processors to edit them to your liking.
Additionally, you can also add your school name, logo, and other information as well as change the questions.
For Mobile App:
Yes, you can! Please follow the given steps to edit the generated Testpapers:
Login to your Teacher Account
Click on “Testpapers” tab on the bottom navbar
Once the Testpaper is generated and saved as a draft, the questions can be deleted or replaced
Select any Testpaper on draft and click on “Resume Editing”
Select “Delete” or “Replace” as per your requirement.
In the case of a Normal Testpaper, you can simply save them as a PDF or copy the questions on the Testpaper and use word processors to edit them to your liking.
Additionally, you can also add your school name, logo, and other information as well as change the questions.
Please follow the given steps to clear cache on an Android device:
Open the "Settings" app on your Android device
Scroll down and tap on "Apps"
Select "App Management" to view all installed apps
Find and tap on the "mySecondTeacher" app
Tap on "Storage usage"
You will see options for "Clear data" and "Clear cache"
Tap on "Clear cache" to remove cached data
This will help improve the app’s performance and resolve minor loading issues.
Yes, you can update your registration details if you have registered on the platform.
Please follow the given steps to update your registration details:
Click on the Profile icon or your profile picture at the top-right corner of the platform
Select "My Profile"
Click on the "Basic Information" tab from the category
Make the necessary changes to your registration details
Click on "Save Changes".
Note: If any of your details, such as your email address, were provided by your school or college, please do not modify them independently. Kindly contact your school or college for assistance to update your information.
Please follow the given steps to clear cache in the Safari browser:
Click on the "Safari" drop-down menu and select "Preferences"
Go to the "Advanced" tab and enable "Show Develop menu in menu bar", then close the Preferences window
From the menu bar, click on "Develop"
Select "Empty Cache"
Note: You may also clear your browser history for better performance.
If an announcement has an expiration date set, it will automatically stop on a specific date. However, you can also stop an active announcement at any time by clicking the “Stop Announcement” button located below it.
Yes, you can edit the Assignments that you have created for your Student(s).
Login to your Teacher account
Click on "Classrooms" tab on the homepage
Click on "Assignments"
Filter the submitted Assignments
Click on “Edit Grade/Remarks”
Fill all the details such as: Assignment Title, Description, Assignment file or link, Deadline date, time and timezone
Click on “Submit”.
Yes, you can view your Diagnostic Report by attempting the End-of-Lesson Quiz in Self-Assess Mode.
Please follow the given steps to view your Diagnostic Report:
Click on “Teaching Resources” from the navigation bar
Select the subject for which you would like to view the Interactive Videos
Choose the relevant chapter and click on the video
At the top-right corner of the video page, beside the search icon, select the option to change the video mode
Switch the mode to Self-Assess Mode
Attempt the End-of-Lesson Quiz to generate and view your Diagnostic Report.
Note: Teaching Mode allows you to watch videos and assign them to students. Whereas, Self-Assess Mode allows you to attempt End-of-Lesson Quizzes and access Diagnostic Reports.
For Mobile App:
You can view the diagnostics reports in two different ways. Please follow the given steps to view your Diagnostic Report:
Method 1:
Login to your Teacher account
Click on the "Resources" tab from the bottom navbar
Select the subject you want to view the videos of
Select the chapter and click on the video
Click on the “Report” section to see the detailed diagnostic report for that video.
Method 2:
Login to your Teacher account
Click on the "Resources" tab from the bottom navbar
Select the subject you want to view the videos of
Select the chapter and click on the video
Change the user mode to "Self-Access" if it is in Teaching Mode
Attempt the "End-of-Lesson Quiz" to generate the Diagnostic Report
You will be redirected to the Report section of the video. Click on the “Report” icon to see the detailed diagnostic report for that video.
If you have forgotten your email address, please contact our support team through the Live Chat feature available at the bottom-right corner of the platform.
Kindly provide the following details for verification:
Full Name
Grade
Section
Contact Number
Once your details have been verified, our Support Team will assist you in retrieving your registered email address.
If you have forgotten your password, please click here to learn how to reset your password.
The Chat Room allows you to communicate in the primary channel as well as with your peers. Even though it acts like an instant messenger to communicate with your peers, it cannot be used explicitly as a messenger.
Please follow the given steps to access Teaching Resources :
Login to your Teacher Account
Go to the “Teaching Resources” tab
Click on “All Subjects” and select an eBook
Choose the relevant “Chapter” and click on the eBook for your preferred subject
Click on “Review eBook” to access the eBook.
Please follow the given steps to clear cache in the Chrome browser:
Open the Chrome browser on your computer
Click on the "More" (three-dot menu) icon at the top-right corner
Select "Clear browsing data"
Choose the time range (select "All Time" to delete everything)
Check the boxes for "Cookies and other site data" and "Cached images and files"
Click on "Clear data"
This will successfully clear the cache from your Chrome browser.
Please follow the given steps to generate Testpaper and assign them as Assignments:
Login to your Teacher Account
Click on "Testpapers" tab from the homepage (You may find options for Standard Testpaper and Custom Testpaper.)
Creating Standard Testpapers
To create a Standard Testpaper, you may find two types of Testpapers: Self-grading Testpaper and Normal Testpaper.
Here are the steps to create a Self-grading Testpaper:
Click on “Generate Testpaper” and the testpaper type, which is Self-grading Testpaper
Choose the type of question bank you want to use and add a title and description for your testpaper
Select the subject of which you want to generate the testpaper
If you want the testpaper questions to be secret, select “Use Secret Questions for Teacher Only”
In Section 1, select the type of question, the number of questions, and the chapters/topics you want to cover
Choose the difficulty level for the questions
Click on “Generate Testpaper” and review the questions. Replace or edit any questions as needed
Click on "Finish Editing"
Click on "Use to create assignment" to use the testpaper as an assignment.
Here are the steps to create a Normal Testpaper:
Click on “Normal Testpaper” and the testpaper type which is normal testpaper
Choose the type of question bank you want to use and add a title and description for your testpaper
If you want the testpaper questions to be secret, select “Use Secret Questions for Teacher Only”
There will be 3 sections, you may select the type of question, the number of questions, and the chapters/topics you want to cover
Choose the difficulty level for the questions
Click on “Generate Testpaper” and review the questions. Replace or edit any questions as needed
Click on "Finish Editing"
Click on "Use to create assignment" to use the testpaper as an assignment.
Creating Custom Testpapers
We can create two types of Custom Testpaper similar to Standard Testpaper. We can create a Normal Custom Testpaper as well as a Self-grading Testpaper.
Here are the steps to create a Self-grading Custom Testpaper:
Click on “Generate Testpaper” and select “Self-grading Testpaper”
Enter the testpaper Title, choose the subject and enter a suitable description
Click on "Add New Question" button and select the type of question that you want to create
After selecting the type of question that you want to create, assign the marks that you want to assign to the testpaper
Type the question in the “Type Your Question” field
Type the answers in the “Type Your Option Here” field
Select the box of the answer which is correct
Click on "Add a New Option" button if you want to add more options
Click on "Save Question" after filling out all the required fields
Insert other questions by clicking on “Add new questions”
After the input of all the questions is finished, click on “Save as draft” to save the testpaper as draft
Click on “Preview My Testpaper” to preview the testpaper and click on “Save Testpaper” to complete the testpaper and make it a Custom Testpaper
Click on "Use to create assignment" to use the testpaper as an assignment.
Here are the steps to create a Normal Custom Testpaper:
Click on “Generate Testpaper” and the testpaper and select “Normal Testpaper”
Enter the testpaper Title, choose the subject, and enter a suitable description
Click on "Add New Question" button and select the type of question that you want to create
After selecting the type of question that you want to create, assign the marks that you want to assign to the testpaper
Type the question in the “Type Your Question” field
Type the answers in the “Type Your Option Here” or “Type Your Answer Here” field
Click on "Add a New Option" button if you want to add more options
Click on "Save Question" after filling out all the required fields
After the input of all the questions is finished, click on “Save as Draft” to save the testpaper as draft
Click on “Preview My Testpaper” to preview the testpaper and click on “Save Testpaper” to complete the testpaper and make it a Custom Testpaper.
After the testpaper is created, click on “Marking Scheme” to view the answers of the questions
Click on "Use to create assignment" to use the testpaper as an assignment.
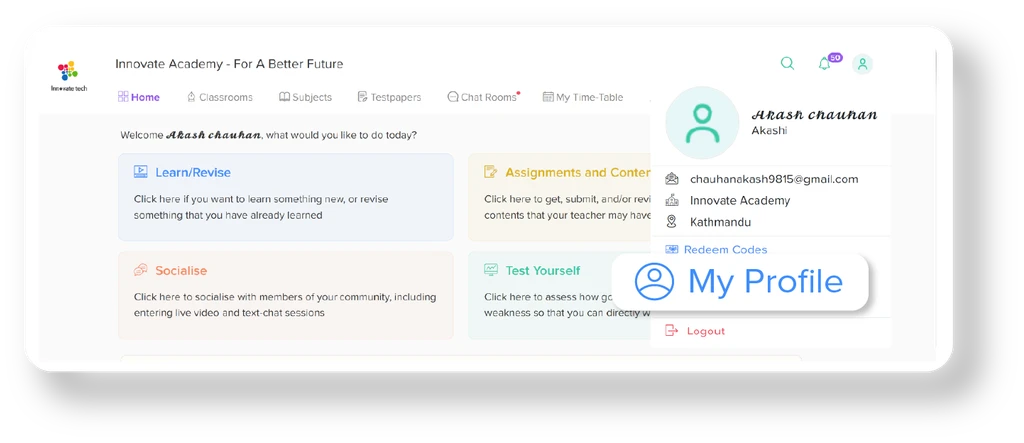
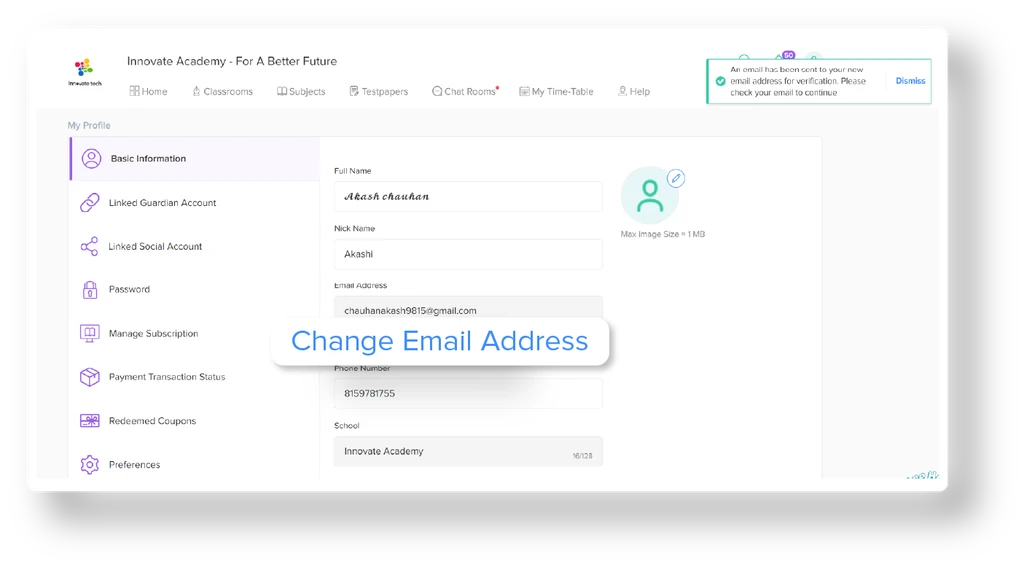
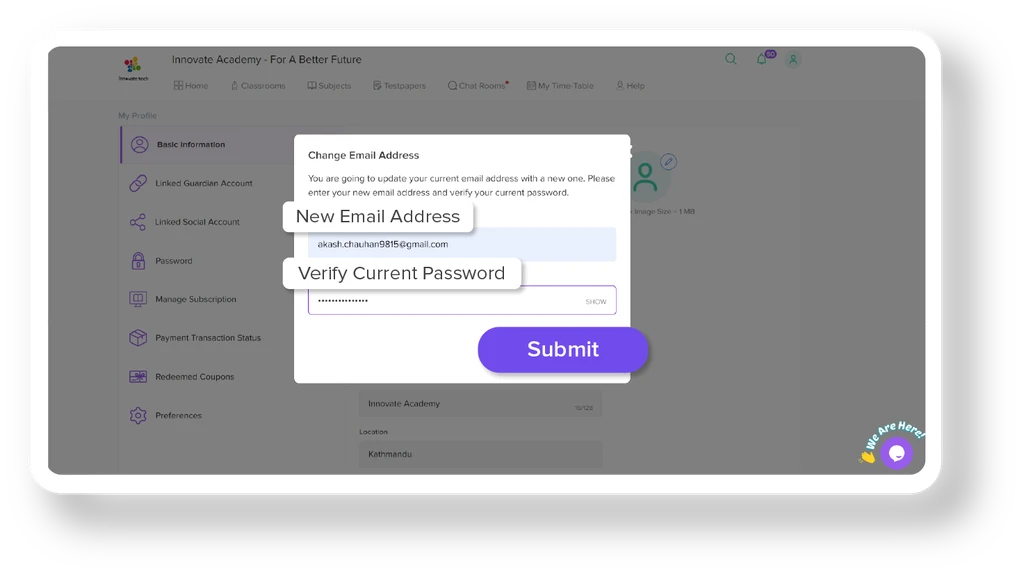
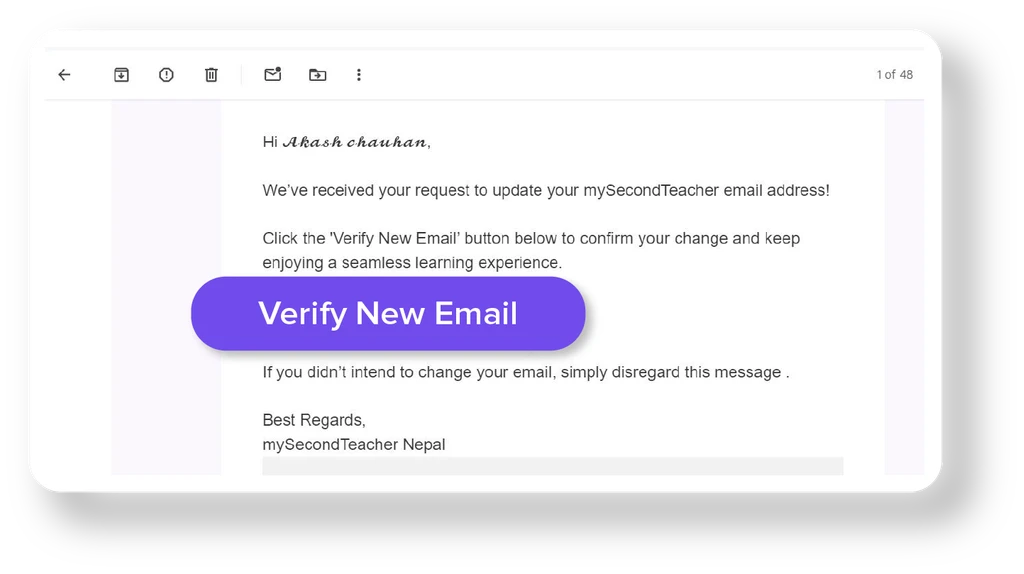
Please follow the given steps to update your dummy email address to your personal email address:
Login to your account and click on “My Profile”
Click on “Change Email Address”
Enter your new personal email address and your current password
Click on “Submit”
A verification link will be sent to your new email address
Open the email and click on “Verify New Email”
Once verified, you will be able to log in using your new email address
If your account is registered with a dummy email address that cannot receive emails, you will not be able to use the password reset feature.
In this case, please send an email to help@mysecondteacher.com.np using your personal email account and provide the following details:
Full Name
Registered Login Email Address
School/College Name
Contact Number
Once we receive and verify the information, our support team will assist you with resetting your password.
Your account might be locked for security reasons because of multiple failed attempts to login into your account. In such a case, we suggest you wait for 10 minutes and try logging in again with the correct email and password.
In case you don’t remember the password click on the "Forgot your password?" on the login page.
To integrate mySecondTeacher into your school/college, please reach out to us via email at “help@mysecondteacher.com.np”. Kindly provide essential details, including your Name, School Name, Designation, and Contact Number, along with your specific requirements.
Once we receive your email, our dedicated department will promptly get in touch with you to facilitate the registration process.
If your testpaper balance is finished, you will not be able to generate testpapers. You can reach out to our Chat Support and provide them with your email, and then our support agent will proceed with your request.
Teachers can use mySecondTeacher to communicate with students through Chat Rooms feature, send Announcements, and even conduct classes in real-time from anywhere.
Please follow the given steps to assign an eBook as an Assignment:
Login to your Teacher Account and select “Give Assignment” from the Action Card
Choose the “eBook Assignment” option
At the top, click on “eBook Assignment” and pick the desired eBook
Select a chapter and click on “Preview” to view the pages
Choose the pages you want to assign
Fill in the required details, set a deadline, and (optionally) schedule the assignment for a later date
Click on "Continue"
Click on “Assign” to complete the process.
Once done, the eBook assignment will be successfully created.
Please follow the given steps to assign an In-book Quiz as an Assignment:
Login to your Teacher Account and click on “Give Assignment” from the Action Card
Select “eBook Assignment” and click on “Continue”
At the top, choose “In-book Quiz Assignment” and select the desired eBook, then click "Continue"
Choose your preferred Chapter
Fill in the required details, set a deadline, and (optionally) schedule the assignment for a later date
Click “Assign” to complete the process.
Your In-book Quiz Assignment will be successfully created.
Please follow the given steps to switch User Modes:
For eBooks
Open an eBook
Click the option in the top-right corner of the screen (highlighted in purple, labeled either Teaching Mode or Self-Assess Mode).
Select “Click Here” and select the preferred mode
Click on “Save Mode”.
For IVys
Open any Interactive Video (IVys)
Click the option in the top-right corner of the screen (highlighted in purple, labeled either Teaching Mode or Self-Assess Mode)
Select “Click Here” and select the preferred mode
Click on “Save Mode”
The real-time insights provided by mySecondTeacher allow teachers and parents to see exactly how students engage with academic. This information can be used to identify areas where students may be struggling or excelling, enabling educators to provide timely interventions and personalised attention. By addressing these needs promptly, mySecondTeacher aims to improve overall academic outcomes.
The “Session” feature on mySecondTeacher allows teachers to create and conduct both online and offline classes, while allowing students to attend and stay updated with their scheduled Sessions.
Teachers can create and schedule In-Class Sessions or set up Online Sessions using external links. Students are notified about upcoming Sessions, helping them stay informed and attend classes on time.
Please follow these steps to create an Online Session (External Session):
Login to your Teacher Account
Go to “Classrooms” tab from the homepage
Select the “Sessions”
Click on “Create New Session”. The session can be created for the entire class(es) or individual Student(s.)
Choose the class, enter the “Session Name”
Select “External Session” as a Session type and add the session link
You can add a description and also attach files
Now, click on “Change” in the Date/Time section to choose the availability of session for one time or repetitive (Here, the start date and end date of the session with time duration can be selected.)
Click on “Continue”.
Now, your Students will be notified.
For Mobile App,
Please follow these steps to create an Online Session (External Session):
Login to your Teacher Account
Go to “Classroom” tab from the bottom navbar
Select the “Sessions”
Click on “Create New Session”. The session can be created for the entire class(es) or individual Student(s.)
Choose the class, enter the “Session Name”
Select “External Session” as a Session type and add the session link
You can add a description and also attach files
Select the date, timezone, start time, and end time (Here, the start date and end date of the session with time duration can be selected.)
Also, choose the “Repeat” option accordingly
Click on “Create Session”.
Now, your Students will be notified.
Please follow these steps to create an In-Class Session:
Login to your Teacher Account
Go to “Classrooms” tab from the homepage
Select the “Sessions”
Click on “Create New Session”. The session can be created for the entire class(es) or individual Student(s.)
Choose the class, enter the “Session Name”
Select “In-Class Session” as a Session type
You can add a description and also attach files
Now, click on “Change” in the Date/Time section to choose the availability of session for one time or repetitive (Here, the start date and end date of the session with time duration can be selected.)
Click on “Continue”.
Now, your Students will be notified.
Please follow these steps to create an In-Class Session:
Login to your Teacher Account
Go to “Classroom” tab from the bottom navbar
Select the “Sessions”
Click on “Create New Session”. The session can be created for the entire class(es) or individual Student(s.)
Choose the class, enter the “Session Name”
Select “In-Class Session” as a Session type and add the session link
You can add a description and also attach files
Select the date, timezone, start time, and end time (Here, the start date and end date of the session with time duration can be selected.)
Also, choose the “Repeat” option accordingly
Click on “Create Session”.
Now, your Students will be notified.
Yes, you can! Please follow the given steps to edit scheduled classes:
Login to your Teacher account
Click on the "Classrooms" tab from the navigation menu
Select the subject
Click on "Sessions"
Select the scheduled Session you would like to edit
Click on "Edit"
Update the Session details such as the Session name, meeting link, and date/time
Click on "Continue"
Your scheduled Session will be updated successfully.
For Mobile App,
Yes, you can! Please follow the given steps to edit scheduled classes:
Login to your Teacher account
Click on "Classrooms" tab from the bottom navbar
Select a subject
Click on “Sessions”
Select the scheduled session and click on “Edit”
Click on "Update Session".
Now, you can change class details such as dates, time and Sessions name for the class.
You can update different sections of your profile to keep your information accurate and up to date.
Please follow the given steps to update information in your Teacher account profile:
Log in to your Teacher account
Click on your Profile icon at the top-right corner of the screen
Select "My Profile"
On the left side, you will see different tabs that you can update, including:
-Basic Information
-Linked Social Account
-Password
-Preferences
Select the relevant tab and make the necessary changes
Click on "Save Changes" to update your profile information.
Teaching Resources provides teachers access to a wide range of teaching materials and makes it easy to organise and share resources with students.
Global Resources: Important resources and teaching materials shared by the mySecondTeacher team for all teachers.
My Resources: A personal library where teachers can upload, manage, and share their own resources with students.
School Resources: A shared library of additional resources among the teachers within the same school.
Please note that Marking Schemes are only available for "Normal Testpaper" that have the answers to the questions generated.
Login to your mySecondTeacher account
Click on the "Testpapers" tab
Open the generated Testpaper
Click on the "Marking Scheme" tab located at the top of the Testpaper window
Note: Marking Scheme is auto-generated with the Testpaper. You can see the marking scheme on the same window as the Testpaper by clicking the Marking Scheme tab on the top of the Testpaper window.
Please follow these steps to archive a Testpaper assigned to students:
Login to your Teacher Account.
Click on the Testpapers tab.
Move your cursor over the Testpaper you want to archive.
Click the Archive Testpaper icon.
Select Archived to view all your archived Testpapers.
Note: Only Testpapers assigned as an Assignment can be archived.